
在MacOS下的安装MySQL5.0.15
You can install MySQL on Mac OS X 10.2.x (“ supported by this package.
The package is located inside a disk image (.dmg) file that you first need to mount by double-clicking its icon in the Finder. It should then mount the image and display its contents.
: Before proceeding with the installation, be sure to shut down all running MySQL server instances by either using the MySQL Manager application (on Mac OS X Server) or via on the command line.
To actually install the MySQL PKG file, double-click on the package icon. This launches the Mac OS X Package Installer, which guides you through the installation of MySQL.
Due to a bug in the Mac OS X package installer, you may see this error message in the destination disk selection dialog:
You cannot install this software on this disk. (null)
If this error occurs, simply click the go Back button once to return to the previous screen. Then click Continue to advance to the destination disk selection agAIn, and you should be able to choose the destination disk correctly. We have reported this bug to apple and it is investigating this problem.
The Mac OS X PKG of MySQL installs itself into /usr/local/mysql- and also installs a symbolic link, VERSION/usr/local/mysql, pointing to the new location. If a directory named /usr/local/mysql exists, it is renamed to /usr/local/mysql.bak first. Additionally, the installer creates the grant tables in the mysql database by executing after the installation.
The installation layout is similar to that of a file binary distribution; all MySQL binaries are located in the directory /usr/local/mysql/bin. The MySQL socket file is created as /tmp/mysql.sock by default.
MySQL installation requires a Mac OS X user account named mysql. A user account with this name should exist by default on Mac OS X 10.2 and up.
If you are running Mac OS X Server, you have a version of MySQL installed. The versions of MySQL that ship with Mac OS X Server versions are shown in the following table:
| 10.2-10.2.2 | 3.23.51 |
| 10.2.3-10.2.6 | 3.23.53 |
| 10.3 | 4.0.14 |
| 10.3.2 | 4.0.16 |
| 10.4.0 | 4.1.10a |
This manual section covers the installation of the official MySQL Mac OS X PKG only. Make sure to read Apple's help information about installing MySQL: Run the “Help View” application, select “Mac OS X Server” help, do a search for “MySQL,” and read the item entitled “Installing MySQL.”
For pre-installed versions of MySQL on Mac OS X Server, note especially that you should start with instead of if MySQL is older than version 4.0.
If you previously used Marc Liyanage's MySQL packages for Mac OS X from http://www.entropy.ch, you can simply follow the update instructions for packages using the binary installation layout as given on his pages.
If you are upgrading from Marc's 3.23.xx versions or from the Mac OS X Server version of MySQL to the official MySQL PKG, you also need to convert the existing MySQL privilege tables to the current format, because some new security privileges have been added.
If you would like to automatically start up MySQL during system startup, you also need to install the MySQL Startup Item. For MySQL 5.0, it is part of the Mac OS X installation disk images as a separate installation package. Simply double-click the MySQLStartupItem.pkg icon and follow the instructions to install it.
Note that the Startup Item need be installed only once! There is no need to install it each time you upgrade the MySQL package later.
The Startup Item for MySQL 5.0 is installed into /Library/StartupItems/MySQLCOM. (Before MySQL 4.1.2, the location was /Library/StartupItems/MySQL, but that collided with the MySQL Startup Item installed by Mac OS X Server.) Startup Item installation adds a variable MYSQLCOM=-YES- to the system configuration file /etc/hostconfig. If you would like to disable the automatic startup of MySQL, simply change this variable to MYSQLCOM=-NO-.
On Mac OS X Server, the default MySQL installation uses the variable MYSQL in the /etc/hostconfig file. The MySQL AB Startup Item installer disables this variable by setting it to MYSQL=-NO-. This avoids boot time conflicts with the MYSQLCOM variable used by the MySQL AB Startup Item. However, it does not shut down a running MySQL server. You should do that yourself.
After the installation, you can start up MySQL by running the following commands in a terminal window. You must have administrator privileges to perform this task.
If you have installed the Startup Item:
shell> sudo /Library/StartupItems/MySQLCOM/MySQLCOM start
(Enter your password, if necessary)
(Press Control-D or enter "exit" to exit the shell)
If you don't use the Startup Item, enter the following command sequence:
shell>cd /usr/local/mysqlshell>sudo ./bin/mysqld_safe(Enter your password, if necessary) (Press Control-Z) shell>bg(Press Control-D or enter "exit" to exit the shell)
You should be able to connect to the MySQL server, for example, by running /usr/local/mysql/bin/mysql.
: The accounts that are listed in the MySQL grant tables initially have no passwords.
You might want to add aliases to your shell's resource file to make it easier to access commonly used programs such as and from the command line. The syntax for is:
alias mysql /usr/local/mysql/bin/mysql
alias mysqladmin /usr/local/mysql/bin/mysqladmin
For , use:
alias mysql=/usr/local/mysql/bin/mysql
alias mysqladmin=/usr/local/mysql/bin/mysqladmin
Even better, add /usr/local/mysql/bin to your PATH environment variable. For example, add the following line to your $HOME/.tcshrc file if your shell is :
setenv PATH ${PATH}:/usr/local/mysql/bin
If no .tcshrc file exists in your home directory, create it with a text editor.
If you are upgrading an existing installation, please note that installing a new MySQL PKG does not remove the directory of an older installation. Unfortunately, the Mac OS X Installer does not yet offer the functionality required to properly upgrade previously installed packages.
To use your existing databases with the new installation, you'll need to copy the contents of the old data directory to the new data directory. Make sure that neither the old server nor the new one is running when you do this. After you have copied over the MySQL database files from the previous installation and have successfully started the new server, you should consider removing the old installation files to save disk space. Additionally, you should also remove older versions of the Package Receipt directories located in /Library/Receipts/mysql-. VERSION.pkg
扫描二维码推送至手机访问。
版权声明:本文由2345好导航站长资讯发布,如需转载请注明出处。
“在MacOS下的安装MySQL5.0.15” 的相关文章
Win 7系统中其他声音正常但酷狗音乐没声音怎么回事
故障现象: Windows 7酷狗软件无声音,系统声音正常。 原因分析: 1. 查看酷狗软件设置 2. 查看系统设置 解决方案: 1. Windows 7操作方法 如图:查看是否处于禁音状态 Windows 7系统声音正常酷狗音乐无声音 2. 查看设置音频输出是否...
windows 7系统下Windows服务被流氓软件注册怎么办?Windows服务
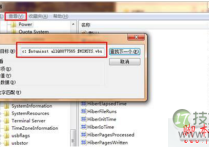
解决方法: 其实处理这些使用流氓软件,需要将相关的.exe文件删除,使它不能再运行,或者直接清除这个服务本身,使计算机重启的时候,它不会再启动。比如Hijackthis扫描,在扫描日志中,一般会把非Windows系统的服务以023的方式列出来,如下面这段: O23 - ...
windows 7如何创建拨号连接
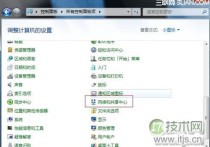
一、打开控制面板,选择“网络和共享中心”; 二、在网络和共享中心中选择“设置新的连接或网络”; 三、选择连接到Internet; 四、选择“仍要设置新的连接”; 五、选择“宽带PPPoE ”; 六、输入对应的宽带帐号及密码,点击连接即可;...
windows 7系统下磁盘出错该如何手动检测修复有哪些方法
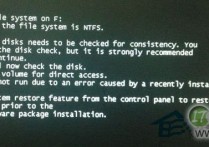
我们在使用Windows 7系统时,一些无意中的操作很可能导致磁盘出现一些小故障,例如系统文件损坏、软件安装过程中出问题、又或者是在传输文件时停电、断电等。通常遇到这些问题,系统都会启动磁盘自动修复功能,但有时系统自动修复不成功,就需要我们手动检测修复了,许多朋友还不知道如何手动修复磁盘,下面几种方...
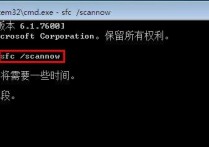
使用系统文件检查器工具来解决在WindowsVista或Windows7上丢失或
假如 Windows 资源保护 (WRP) 文件丢失或已损坏,Windows 可能不像预期的那样。例如,Windows 中的某些功能可能不起作用,或者 Windows 可能会崩溃。(SFC.exe) 的系统文件检查器工具扫描缺少或损坏的系统文件,并进行修复。 操作步骤: 一、使用系统文件检查器工...
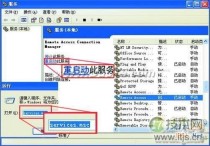
windows 7系统无法创建远程连接管理服务的解决方法
要解决这个故障,我们需要启动Remote Access Connection Manager与Network Connections及Telephony服务。我们可通过两种方法启动服务: 启动方法一:打开Windows左下方的“开始 ->运行”,在对话框内输入services.msc,在弹出...